Data Flow Diagrams and Threat Models

Last time we looked at some generic diagrams from the C4 model, which are useful for most teams. This time we’re going to explore a more specific type of diagram that can be a tremendous help with security.

Data Flow Diagrams

A Data Flow Diagram (DFD), as the name indicates, shows the flow of data through the system. It depicts external entities, processes, data stores, and data flows. Larger systems usually have composite processes, which expand into their own DFD.

Here’s a simple example of a data flow diagram:

Create a Data Flow Diagram from a Container Diagram

If you already have a container diagram of your system, then it’s easy to create a DFD from it:

  1. Convert containers into processes by drawing them as circles. You may or may not want to number them. Complicate containers with many processes running in them may be modeled as composite process that expand into their own sub-DFD.
  2. Convert external systems into external entities by drawing them as rectangles.
  3. Convert databases and queues into data stores by drawing them as horizontal parallel bars.
  4. Modify the directions of all the arrows as needed. In a container diagram, the direction of an arrow usually indicates who initiates a request. In a data flow diagram, the direction of an arrow indicates the direction in which data flows. This could be both ways.
    Some people use arrows to indicate data flows in container diagrams as well. In that case, you don’t have anything to do in this step.

Now, why would you go through the trouble to convert a container diagram into a DFD? There are several uses for DFDs, but in this post I want to focus on using them for threat modeling.

Threat Models

In threat modeling, we look for design flaws with security implications. These are different from implementation bugs, which makes them hard to detect using code-based techniques such as Static Application Security Testing (SAST) or security code reviews. But the flip side of that is that you can do threat modeling even before any code is written. And you should!

Threat modeling falls under Threat Assessment in the Software Assurance Maturity Model.

There are many ways to do build threat models, but the one I’ve found easiest to understand for developers with limited security knowledge (which is the vast majority), is to use STRIDE, an acronym for the types of security threats that exist:

  • Spoofing
  • Tampering
  • Repudiation
  • Information disclosure
  • Denial of service
  • Elevation of privilege

Using DFDs to Build Threat Models

Not all of the STRIDE threats are applicable to all elements of our system, and this is where the DFD comes in handy, since each DFD element maps nicely unto some subset of the STRIDE threats:

So now you have a structured process for reviewing your architecture from a security perspective:

  1. Create a DFD from your container diagram (or from scratch if you don’t have one)
  2. Identify the threats using STRIDE
  3. Score the threats using the Common Vulnerability Scoring System (CVSS)
  4. Manage the risks posed by the identified threats:

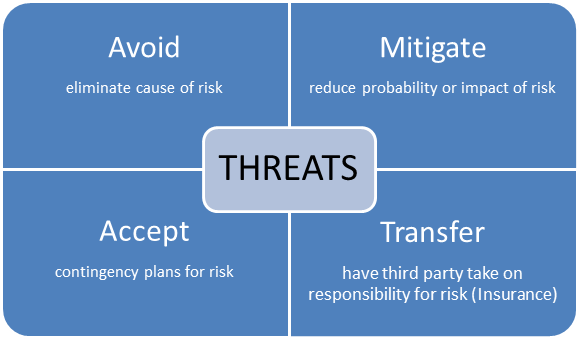
I’ve found that using CVSS scores for threats makes it easier to decide how to manage them. You can set a security risk appetite for your system, for example accept threats in the None through Medium levels and work to avoid or mitigate High or Critical levels.

CVSS scores also go a long way towards making the threat assessment objective, which makes it easier to convince people that work should be done to reduce the security risk.

Costs and Benefits of Threat Models

If all of this seems like a lot of work, especially for a big system, that’s because it is. Sorry.

It’s not quite as bad as it may seem, however, because DFD elements can usually be grouped since they all behave the same from a security perspective. So then you only have to score and manage the group as a whole rather than all the elements in it individually. But still, threat modeling is a considerable investment.

When I’ve done this activity with developers, I see that it always provides a lot of value. We usually find one or more security threats that we really need to manage better. And most of the time participants get a much better understanding of their system, which helps them in their non-security work as well.

What do you think? Is threat modeling using data flow diagrams and STRIDE something you’re willing to give a shot, or do you prefer a method that requires less work (but offers less protection), like abuse cases? Please leave a comment.

How to manage dependencies in a Gradle multi-project build

gradleI’ve been a fan of the Gradle build tool from quite early on. Its potential was clear even before the 1.0 version, when changes were regularly breaking. Today, upgrading rarely cause surprises. The tool has become mature and performs well.

Gradle includes a powerful dependency management system that can work with Maven and Ivy repositories as well as local file system dependencies.

During my work with Gradle I’ve come to rely on a pattern for managing dependencies in a multi-project build that I want to share. This pattern consists of two key practices:

  1. Centralize dependency declarations in build.gradle
  2. Centralize dependency version declarations in gradle.properties

Both practices are examples of applying software development best practices like DRY to the code that makes up the Gradle build. Let’s look at them in some more detail.

Centralize dependency declarations

In the root project’s build.gradle file, declare a new configuration for each dependency used in the entire project. In each sub-project that uses the dependency, declare that the compile (or testCompile, etc) configuration extends the configuration for the dependency:

subprojects {
  configurations {
    commonsIo
  }

  dependencies {
    commonsIo 'commons-io:commons-io:2.5'
  }
}
configurations {
  compile.extendsFrom commonsIo
}

By putting all dependency declarations in a single place, we know where to look and we prevent multiple sub-projects from declaring the same dependency with different versions.

Furthermore, the sub-projects are now more declarative, specifying only what logical components they depend on, rather than all the details of how a component is built up from individual jar files. When there is a one-to-one correspondence, as in the commons IO example, that’s not such a big deal, but the difference is pronounced when working with components that are made up of multiple jars, like the Spring framework or Jetty.

Centralize dependency version declarations

The next step is to replace all the version numbers from the root project’s build.gradle file by properties defined in the root project’s gradle.properties:

dependencies {
  commonsIo "commons-io:commons-io:$commonsIoVersion"
}
commonsIoVersion=2.5

This practice allows you to reuse the version numbers for related dependencies. For instance, if you’re using the Spring framework, you may want to declare dependencies on spring-mvc and spring-jdbc with the same version number.

There is an additional advantage of this approach. Upgrading a dependency means updating gradle.properties, while adding a new dependency means updating build.gradle. This makes it easy to gauge from a commit feed what types of changes could have been made and thus to determine whether a closer inspection is warranted.

You can take this a step further and put the configurations and dependencies blocks in a separate file, e.g. dependencies.gradle.

And beyond…

Having all the dependencies declared in a single location is a stepping stone to more advanced supply chain management practices.

The centrally declared configurations give a good overview of all the components that you use in your product, the so-called Bill of Materials (BOM). You can use the above technique, or use the Gradle BOM plugin.

The BOM makes it easier to use a tool like OWASP DependencyCheck to check for publicly disclosed vulnerabilities in the dependencies that you use. At EMC, about 80% of vulnerabilities reported against our products are caused by issues in 3rd party components, so it makes sense to keep a security eye on dependencies.

A solid BOM also makes it easier to review licenses and their compliance requirements. If you can’t afford a tool like BlackDuck Protex, you can write something less advanced yourself with modest effort.

How To Start With Software Security – Part 2

white-hatLast time, I wrote about how an organization can get started with software security.

Today I will look at how to do that as an individual.

From Development To Secure Development

As a developer, I wasn’t always aware of the security implications of my actions.

Now that I’m the Engineering Security Champion for my project, I have to be.

It wasn’t an easy transition. The security field is vast and I keep learning something new almost every day. I read a number of books on security, some of which I reviewed on this site.

As an aspiring software craftsman, I realize that personal efforts are only half the story. The other half is the community of professionals.

Secure Development Communities

I’m lucky to work in a big organization, where such a community already exist.

EMC’s Product Security Office (PSO) provides me with a personal security adviser, maintains a security-related wiki, and operates a space on our internal collaboration environment.

communityIf your organization doesn’t have something like our PSO, you can look elsewhere. (And if it does, you should look outside too!)

OWASP is a great place to start.

They actually have three sub-communities, one of which is for Builders.

But it’s also good to look at the other sub-communities, since they’re all related. Looking at things from the perspective of the others can be quite enlightening.

That’s also why it’s a good idea to attend a security conference, if you can. OWASP holds annual AppSec conferences in three geos. The RSA Conference is another good place to meet your peers.

If you can’t afford to attend a conference, you can always follow the security section of Stack Exchange or watch SecurityTube.

Contributing To The Community

So far I’ve talked about taking in information, but you shouldn’t forget to share your personal experiences as well.

contributeYou may think you know very little yet, but even then it’s valuable to share.

It helps to organize your thoughts, which is crucial when learning and you may find you’ll gain insights from comments that readers leave as well.

More to the point, there are many others out there that are getting started and who would benefit from seeing they are not alone.

Apart from posting to this blog, I also contribute to the EMC Developer Network, where I’m currently writing a series on XML and Security.

There are other ways to contribute as well. You could join or start an OWASP chapter, for instance.

What Do You Think?

How did you get started with software security? How do you keep up with the field? What communities are you part of? Please leave a comment.

How To Start With Software Security

white-hatThe software security field sometimes feels a bit negative.

The focus is on things that went wrong and people are constantly told what not to do.

Build Security In

One often heard piece of advice is that one cannot bolt security on as an afterthought, that it has to be built in.

But how do we do that? I’ve written earlier about two approaches: Cigital’s TouchPoints and Microsoft’s Security Development Lifecycle (SDL).

The Touchpoints are good, but rather high-level and not so actionable for developers starting out with security. The SDL is also good, but rather heavyweight and difficult to adopt for smaller organizations.

The Software Assurance Maturity Model (SAMM)

We need a framework that we can ease into in an iterative manner. It should also provide concrete guidance for developers that don’t necessarily have a lot of background in the security field.

Enter OWASP‘s SAMM:

The Software Assurance Maturity Model (SAMM) is an open framework to help organizations formulate and implement a strategy for software security that is tailored to the specific risks facing the organization.

SAMM assumes four business functions in developing software and assigns three security practices to each of those:

opensamm-security-practices

For each practice, three maturity levels are defined, in addition to an implicit Level 0 where the practice isn’t performed at all. Each level has an objective and several activities to meet the objective.

To get a baseline of the current security status, you perform an assessment, which consists of answering questions about each of the practices. The result of an assessment is a scorecard. Comparing scorecards over time gives insight into evolving security capabilities.

With these building blocks in place, you can build a roadmap for improving your capabilities.

A roadmap consists of phases in which certain practices are improved so that they reach a higher level. SAMM even provides roadmap templates for specific types of organizations to get you started quickly.

What Do You Think?

Do you think the SAMM is actionable? Would it help your organization build out a roadmap for improving its security capabilities? Please leave a comment.

How To Implement Input Validation For REST resources

rest-validationThe SaaS platform I’m working on has a RESTful interface that accepts XML payloads.

Implementing REST Resources

For a Java shop like us, it makes sense to use JAX-B to generate JavaBean classes from an XML Schema.

Working with XML (and JSON) payloads using JAX-B is very easy in a JAX-RS environment like Jersey:

@Path("orders")
public class OrdersResource {
  @POST
  @Consumes({ "application/xml", "application/json" })
  public void place(Order order) {
    // Jersey marshalls the XML payload into the Order 
    // JavaBean, allowing us to write type-safe code 
    // using Order's getters and setters.
    int quantity = order.getQuantity();
    // ...
  }
}

(Note that you shouldn’t use these generic media types, but that’s a discussion for another day.)

The remainder of this post assumes JAX-B, but its main point is valid for other technologies as well. Whatever you do, please don’t use XMLDecoder, since that is open to a host of vulnerabilities.

Securing REST Resources

Let’s suppose the order’s quantity is used for billing, and we want to prevent people from stealing our money by entering a negative amount.

We can do that with input validation, one of the most important tools in the AppSec toolkit. Let’s look at some ways to implement it.

Input Validation With XML Schema

xml-schemaWe could rely on XML Schema for validation, but XML Schema can only validate so much.

Validating individual properties will probably work fine, but things get hairy when we want to validate relations between properties. For maximum flexibility, we’d like to use Java to express constraints.

More importantly, schema validation is generally not a good idea in a REST service.

A major goal of REST is to decouple client and server so that they can evolve separately.

If we validate against a schema, then a new client that sends a new property would break against an old server that doesn’t understand the new property. It’s usually better to silently ignore properties you don’t understand.

JAX-B does this right, and also the other way around: properties that are not sent by an old client end up as null. Consequently, the new server must be careful to handle null values properly.

Input Validation With Bean Validation

bean-validationIf we can’t use schema validation, then what about using JSR 303 Bean Validation?

Jersey supports Bean Validation by adding the jersey-bean-validation jar to your classpath.

There is an unofficial Maven plugin to add Bean Validation annotations to the JAX-B generated classes, but I’d rather use something better supported and that works with Gradle.

So let’s turn things around. We’ll handcraft our JavaBean and generate the XML Schema from the bean for documentation:

@XmlRootElement(name = "order")
public class Order {
  @XmlElement
  @Min(1)
  public int quantity;
}
@Path("orders")
public class OrdersResource {
  @POST
  @Consumes({ "application/xml", "application/json" })
  public void place(@Valid Order order) {
    // Jersey recognizes the @Valid annotation and
    // returns 400 when the JavaBean is not valid
  }
}

Any attempt to POST an order with a non-positive quantity will now give a 400 Bad Request status.

Now suppose we want to allow clients to change their pending orders. We’d use PATCH or PUT to update individual order properties, like quantity:

@Path("orders")
public class OrdersResource {
  @Path("{id}")
  @PUT
  @Consumes("application/x-www-form-urlencoded")
  public Order update(@PathParam("id") String id, 
      @Min(1) @FormParam("quantity") int quantity) {
    // ...
  }
}

We need to add the @Min annotation here too, which is duplication. To make this DRY, we can turn quantity into a class that is responsible for validation:

@Path("orders")
public class OrdersResource {
  @Path("{id}")
  @PUT
  @Consumes("application/x-www-form-urlencoded")
  public Order update(@PathParam("id") String id, 
      @FormParam("quantity")
      Quantity quantity) {
    // ...
  }
}
@XmlRootElement(name = "order")
public class Order {
  @XmlElement
  public Quantity quantity;
}
public class Quantity {
  private int value;

  public Quantity() { }

  public Quantity(String value) {
    try {
      setValue(Integer.parseInt(value));
    } catch (ValidationException e) {
      throw new IllegalArgumentException(e);
    }
  }

  public int getValue() {
    return value;
  }

  @XmlValue
  public void setValue(int value) 
      throws ValidationException {
    if (value < 1) {
      throw new ValidationException(
          "Quantity value must be positive, but is: " 
          + value);
    }
    this.value = value;
  }
}

We need a public no-arg constructor for JAX-B to be able to unmarshall the payload into a JavaBean and another constructor that takes a String for the @FormParam to work.

setValue() throws javax.xml.bind.ValidationException so that JAX-B will stop unmarshalling. However, Jersey returns a 500 Internal Server Error when it sees an exception.

We can fix that by mapping validation exceptions onto 400 status codes using an exception mapper. While we’re at it, let’s do the same for IllegalArgumentException:

@Provider
public class DefaultExceptionMapper 
    implements ExceptionMapper<Throwable> {

  @Override
  public Response toResponse(Throwable exception) {
    Throwable badRequestException 
        = getBadRequestException(exception);
    if (badRequestException != null) {
      return Response.status(Status.BAD_REQUEST)
          .entity(badRequestException.getMessage())
          .build();
    }
    if (exception instanceof WebApplicationException) {
      return ((WebApplicationException)exception)
          .getResponse();
    }
    return Response.serverError()
        .entity(exception.getMessage())
        .build();
  }

  private Throwable getBadRequestException(
      Throwable exception) {
    if (exception instanceof ValidationException) {
      return exception;
    }
    Throwable cause = exception.getCause();
    if (cause != null && cause != exception) {
      Throwable result = getBadRequestException(cause);
      if (result != null) {
        return result;
      }
    }
    if (exception instanceof IllegalArgumentException) {
      return exception;
    }
    if (exception instanceof BadRequestException) {
      return exception;
    }
    return null;
  }

}

Input Validation By Domain Objects

dddEven though the approach outlined above will work quite well for many applications, it is fundamentally flawed.

At first sight, proponents of Domain-Driven Design (DDD) might like the idea of creating the Quantity class.

But the Order and Quantity classes do not model domain concepts; they model REST representations. This distinction may be subtle, but it is important.

DDD deals with domain concepts, while REST deals with representations of those concepts. Domain concepts are discovered, but representations are designed and are subject to all kinds of trade-offs.

For instance, a collection REST resource may use paging to prevent sending too much data over the wire. Another REST resource may combine several domain concepts to make the client-server protocol less chatty.

A REST resource may even have no corresponding domain concept at all. For example, a POST may return 202 Accepted and point to a REST resource that represents the progress of an asynchronous transaction.

ubiquitous-languageDomain objects need to capture the ubiquitous language as closely as possible, and must be free from trade-offs to make the functionality work.

When designing REST resources, on the other hand, one needs to make trade-offs to meet non-functional requirements like performance, scalability, and evolvability.

That’s why I don’t think an approach like RESTful Objects will work. (For similar reasons, I don’t believe in Naked Objects for the UI.)

Adding validation to the JavaBeans that are our resource representations means that those beans now have two reasons to change, which is a clear violation of the Single Responsibility Principle.

We get a much cleaner architecture when we use JAX-B JavaBeans only for our REST representations and create separate domain objects that handle validation.

Putting validation in domain objects is what Dan Bergh Johnsson refers to as Domain-Driven Security.

cave-artIn this approach, primitive types are replaced with value objects. (Some people even argue against using any Strings at all.)

At first it may seem overkill to create a whole new class to hold a single integer, but I urge you to give it a try. You may find that getting rid of primitive obsession provides value even beyond validation.

What do you think?

How do you handle input validation in your RESTful services? What do you think of Domain-Driven Security? Please leave a comment.

The Lazy Developer’s Way to an Up-To-Date Libraries List

groovyLast time I shared some tips on how to use libraries well. I now want to delve deeper into one of those: Know What Libraries You Use.

Last week I set out to create such a list of embedded components for our product. This is a requirement for our Security Development Lifecycle (SDL).

However, it’s not a fun task. As a developer, I want to write code, not update documents! So I turned to my friends Gradle and Groovy, with a little help from Jenkins and Confluence.

Gradle Dependencies

We use Gradle to build our product, and Gradle maintains the dependencies we have on third-party components.

Our build defines a list of names of configurations for embedded components, copyBundleConfigurations, for copying those to the distribution directory. From there, I get to the external dependencies using Groovy’s collection methods:

def externalDependencies() {
  copyBundleConfigurations.collectMany { 
    configurations[it].allDependencies 
  }.findAll {
    !(it instanceof ProjectDependency) && it.group &&
        !it.group.startsWith('com.emc')
  }
}

Adding Required Information

However, Gradle dependencies don’t contain all the required information.

For instance, we need the license under which the library is distributed, so that we can ask the Legal department permission for using it.

So I added a simple XML file to hold the additional info. Combining that information with the dependencies that Gradle maintains is easy using Groovy’s XML support:

ext.embeddedComponentsInfo = 'embeddedComponents.xml'

def externalDependencyInfos() {
  def result = new TreeMap()
  def componentInfo = new XmlSlurper()
      .parse(embeddedComponentsInfo)
  externalDependencies().each { dependency ->
    def info = componentInfo.component.find { 
      it.id == "$dependency.group:$dependency.name" &&
          it.friendlyName?.text() 
    }
    if (!info.isEmpty()) {
      def component = [
        'id': info.id,
        'friendlyName': info.friendlyName.text(),
        'version': dependency.version,
        'latestVersion': info.latestVersion.text(),
        'license': info.license.text(),
        'licenseUrl': info.licenseUrl.text(),
        'comment': info.comment.text()
      ]
      result.put component.friendlyName, component
    }
  }
  result.values()
}

I then created a Gradle task to write the information to an HTML file. Our Jenkins build executes this task, so that we always have an up-to-date list. I used Confluence’s html-include macro to include the HTML file in our Wiki.

Now our Wiki is always up-to-date.

Automatically Looking Up Missing Information

The next problem was to populate the XML file with additional information.

Had we had this file from the start, adding that information manually would not have been a big deal. In our case, we already had over a hundred dependencies, so automation was in order.

First I identified the components that miss the required information:

def missingExternalDependencies() {
  def componentInfo = new XmlSlurper()
      .parse(embeddedComponentsInfo)
  externalDependencies().findAll { dependency ->
    componentInfo.component.find { 
      it.id == "$dependency.group:$dependency.name" && 
          it.friendlyName?.text() 
    }.isEmpty()
  }.collect {
    "$it.group:$it.name"
  }.sort()
}

Next, I wanted to automatically look up the missing information and add it to the XML file (using Groovy’s MarkupBuilder). In case the required information can’t be found, the build should fail:

project.afterEvaluate {
  def missingComponents = missingExternalDependencies()
  if (!missingComponents.isEmpty()) {
    def manualComponents = []
    def writer = new StringWriter() 
    def xml = new MarkupBuilder(writer)
    xml.expandEmptyElements = true
    println 'Looking up information on new dependencies:'
    xml.components {
      externalDependencyInfos().each { existingComponent ->
        component { 
          id(existingComponent.id)
          friendlyName(existingComponent.friendlyName)
          latestVersion(existingComponent.latestVersion)
          license(existingComponent.license)
          licenseUrl(existingComponent.licenseUrl)
          approved(existingComponent.approved)
          comment(existingComponent.comment)
        }
      }
      missingComponents.each { missingComponent ->
        def lookedUpComponent = collectInfo(missingComponent)
        component {
          id(missingComponent)
          friendlyName(lookedUpComponent.friendlyName)
          latestVersion(lookedUpComponent.latestVersion)
          license(lookedUpComponent.license)
          licenseUrl(lookedUpComponent.licenseUrl)
          approved('?')
          comment(lookedUpComponent.comment)
        }
        if (!lookedUpComponent.friendlyName || 
            !lookedUpComponent.latestVersion || 
            !lookedUpComponent.license) {
          manualComponents.add lookedUpComponent.id
          println '    => Please enter information manually'
        }
      }
    }
    writer.close()
    def embeddedComponentsFile = 
        project.file(embeddedComponentsInfo)
    embeddedComponentsFile.text = writer.toString()
    if (!manualComponents.isEmpty()) {
      throw new GradleException('Missing library information')
    }
  }
}

Anyone who adds a dependency in the future is now forced to add the required information.

So all that is left to implement is the collectInfo() method.

There are two primary sources that I used to look up the required information: the SpringSource Enterprise Bundle Repository holds OSGi bundle versions of common libraries, while Maven Central holds regular jars.

Extracting information from those sources is a matter of downloading and parsing XML and HTML files. This is easy enough with Groovy’s String.toURL() and URL.eachLine() methods and support for regular expressions.

Conclusion

All of this took me a couple of days to build, but I feel that the investment is well worth it, since I no longer have to worry about the list of used libraries being out of date.

How do you maintain a list of used libraries? Please let me know in the comments.

Seven Tips For Using Third-Party Libraries

libraryThere are many good reasons to use code written by others in your application.

This post describes some best practices to optimize your re-use experience.

Library Use Gone Bad

I recently discovered that a library we use for OpenID didn’t handle every situation properly. When I checked for an update, I found that the library is no longer maintained. So I found an alternative and tried to swap that new library in, only to discover that classes from the old library were used all over the place.

This little story shows that a lot can go wrong with using third-party libraries.

The remainder of this post will look at how to use libraries properly. I’m going to focus on open source projects, but most of the same considerations apply for commercial libraries.

1. Use Only Actively Maintained Libraries

Look at things like the date of the latest release, the number of developers contributing, and the sponsoring organizations.

2. Use Only Libraries With an Appropriate License

What’s appropriate for you obviously depends on your context. For instance, if you’re building and distributing a commercial, closed source application, you shouldn’t use any library that only comes with the GPL.

3. Limit the Amount of Code That Touches the Library

Use the Facade design pattern to wrap the library in your own interface. This has several advantages:

  • It allows you to easily replace the library with another, should the need arise
  • It documents what parts of the library you are actually using
  • It allows you to add functionality that the library should have provided but doesn’t, and do so in a logical place

4. Keep the Library Up-to-date

Many developers live by the rule “if it ain’t broke, don’t fix it”. However, you may not notice some of the things that are broken. For instance, many libraries contain security vulnerabilities that are fixed in later versions. You won’t notice these problems until a hacker breaches your application.

5. Write Regression Tests For the Library

If you’re regularly going to update the library, as I suggest, then you’d better know whether they broke anything in a new release. So you need to write some tests that prove the functionality that you want to use from the library.

As a bonus, these tests double as documentation on how to use the library.

6. Know What Libraries You Use

You should always be able to tell what libraries you are using at
any given moment, as well as their versions and licenses. You just never know when someone from the security team is going to call you about a critical vulnerability in a specific version of a library, or when the legal department suddenly decides to forbid the use of a certain license.

7. Take Ownership of the Library

Your application provides functionality to its users. They don’t care whether you build that functionality yourself, or whether you use a library. Not should they. When there is a problem anywhere in your code, you need to be able to fix it.

So think about how you are going to do that for the libraries you plan on using. Are the developing organizations responsive to bug reports? Do you have access to the source? Are the developing organizations willing to apply your patches? Does the license permit modifying the code for private use?

So what have your experiences been with using third-party libraries? Please let me know in the comments.

Book review: Secure Programming with Static Analysis

Secure Programming with Static AnalysisOne thing that should be part of every Security Development Lifecycle (SDL) is static code analysis.

This topic is explained in great detail in Secure Programming with Static Analyis.

Chapter 1, The Software Security Problem, explains why security is easy to get wrong and why typical methods for catching bugs aren’t effective for finding security vulnerabilities.

Chapter 2, Introduction to Static Analysis, explains that static analysis involves a software program checking the source code of another software program to find structural, quality, and security problems.

Chapter 3, Static Analysis as Part of Code Review, explains how static code analysis can be integrated into a security review process.

Chapter 4, Static Analysis Internals, describes how static analysis tools work internally and what trade-offs are made when building them.

This concludes the first part of the book that describes the big picture. Part two deals with pervasive security problems.

InputChapter 5, Handling Input, describes how programs should deal with untrustworthy input.

Chapter 6, Buffer Overflow, and chapter 7, Bride to Buffer Overflow, deal with buffer overflows. These chapters are not as interesting for developers working with modern languages like Java or C#.

Chapter 8, Errors and Exceptions, talks about unexpected conditions and the link with security issues. It also handles logging and debugging.

Chapter 9, Web Applications, starts the third part of the book about common types of programs. This chapter looks at security problems specific to the Web and HTTP.

Chapter 10, XML and Web Services, discusses the security challenges associated with XML and with building up applications from distributed components.

CryptographyChapter 11, Privacy and Secrets, switches the focus from AppSec to InfoSec with an explanation of how to protect private information.

Chapter 12, Privileged Programs, continues with a discussion on how to write programs that operate with different permissions than the user.

The final part of the book is about gaining experience with static analysis tools.

Chapter 13, Source Code Analysis Exercises for Java, is a tutorial on how to use Fortify (a trial version of which is included with the book) on some sample Java projects.

Chapter 14, Source Code Analysis Exercises for C does the same for C programs.

rating-five-out-of-five

This book is very useful for anybody working with static analysis tools. Its description of the internals of such tools helps with understanding how to apply the tools best.

I like that the book is filled with numerous examples that show how the tools can detect a particular type of problem.

Finally, the book makes clear that any static analysis tool will give both false positives and false negatives. You should really understand security issues yourself to make good decisions. When you know how to do that, a static analysis tool can be a great help.

Building Both Security and Quality In

One of the important things in a Security Development Lifecycle (SDL) is to feed back information about vulnerabilities to developers.

This post relates that practice to the Agile practice of No Bugs.

The Security Incident Response

Even though we work hard to ship our software without security vulnerabilities, we never succeed 100%.

When an incident is reported (hopefully responsibly), we execute our security response plan. We must be careful to fix the issue without introducing new problems.

Next, we should also look for similar issues to the one reported. It’s not unlikely that there are issues in other parts of the application that are similar to the reported one. We should find and fix those as part of the same security update.

Finally, we should do a root cause analysis to determine why this weakness slipped through the cracks in the first place. Armed with that knowledge, we can adapt our process to make sure that similar issues will not occur in the future.

From Security To Quality

The process outlined above works well for making our software ever more secure.

But security weaknesses are essentially just bugs. Security issues may have more severe consequences than regular bugs, but most regular bugs are expensive to fix once the software is deployed as well.

So it actually makes sense to treat all bugs, security or otherwise, the same way.

As the saying goes, an ounce of prevention is worth a pound of cure. Just as we need to build security in, we also need to build quality in general in.

Building Quality In Using Agile Methods

This has been known in the Agile and Lean communities for a long time. For instance, James Shore wrote about it in his excellent book The Art Of Agile Development and Elisabeth Hendrickson thinks that there should be so little bugs that they don’t need triaging.

Some people object to the Zero Defects mentality, claiming that it’s unrealistic.

There is, however, clear evidence of much lower defect rates for Agile development teams. Many Lean implementations also report successes in their quest for Zero Defects.

So there is at least anecdotal evidence that a very significant reduction of defects is possible.

This will require change, of course. Testers need to change and so do developers. And then everybody on the team needs to speak the same language and work together as a single team instead of in silos.

If we do this well, we’ll become bug exterminators that delight our customers with software that actually works.